")
")
")

MK KOLEKT installation guide
Careful chimney installation will ensure long and flawless functioning of the chimney system.
If installation is done with a few days break, chimney must be protected from humidity.
Before starting assembling chimney, You must decide: where would be cleanup doors, at which height tee must be installed. If ventilation channel is near chimney, predict ventilation channel height. Free-standing part of the chimney must be statically reinforced. This can be done by fitting the reinforcing bars. Reinforcing bars must be centered inside holes at the corners of blocks, mixed grouting mortar poured into the reinforcing channels.
- Build the chimney on a pre-prepared concrete foundation.
- Connect blocks using mortar.
- Place mortar on the walls of blocks (ventilation channels at the corners of blocks and mineral wool must not contact with mortar).
- Ceramic elements are connected with special acid-resistant glue. Before lubricating glue You must clean ceramic tube edges. Clean the end of the ceramic flue pipe with a sponge before lubricating glue.
- Connect condensation container to the drain.
If installation is done with a few days break, chimney must be protected from humidity.
| 1 | Sub-floor construction |
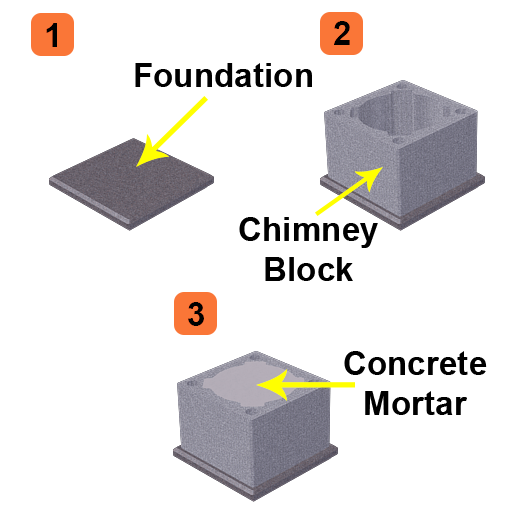
- Lay insulation material;
- Construct 20-30 cm sub-floor from concrete or masonry;
- Or first chimney block fill up with mortar.
| Beginning of construction | 2 |

- Mark out size of the hole onto chimney block wall;
- Cut marked hole with angle grinder and put in ventilation grills;
- Place the first precut chimney block on the mortar;/li>
- Place inside block condensation container. Place container on the mortar, turn drainage pipe to the side of pre-cut hole.<
| 3 | Installation of the inspection pipe |

- Mark out size of the inspection pipe hole onto chimney block wall;
- Cut marked hole with angle grinder;
- Place block on a bed of mortar;
- Insert insulation into the block and cut mineral wool along the hole;
- Clean edges of the condensation container and spread high temperature sealant;
- Insert inspection pipe;
- Insert insulation into next block and place on previous block with mortar.
| Installation of the junction pipe | 4 |
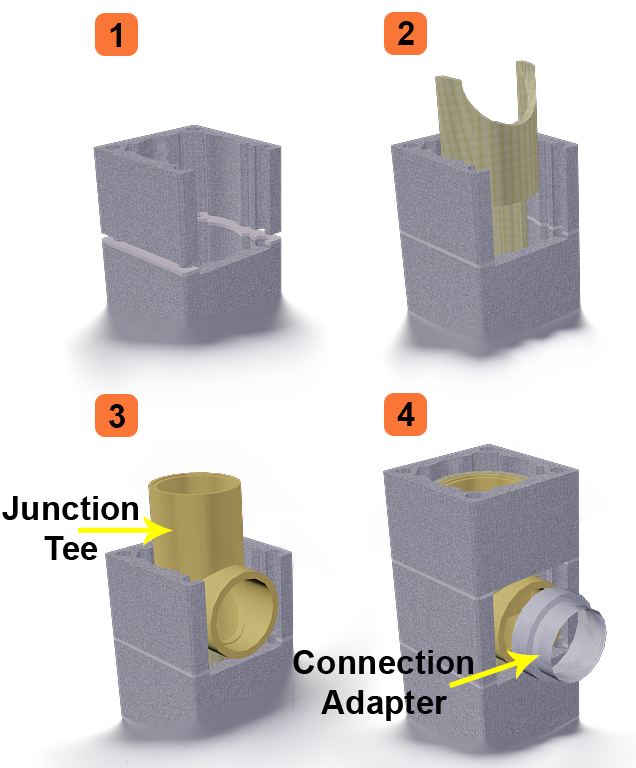
- Mark out size of the junction pipe hole onto chimney block wall;
- Cut marked hole with angle grinder and place pre-cut block on a bed of mortar;
- Insert insulation into the block and cut of, so it would not block hole;
- Clean edges of ceramic pipe and spread high temperature sealant on it;
- Insert junction pipe;
- Remove excess ceramic sealant with a sponge;
- Insert insulation into next block and place on previous block with mortar.
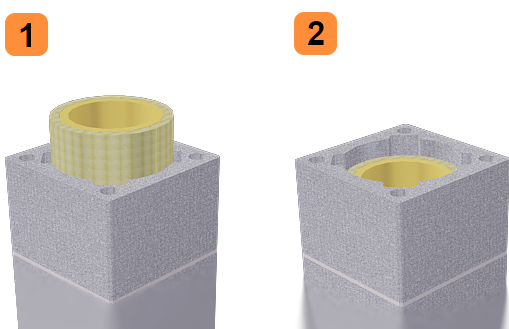
| 5 | Standard installation steps |

- Place block on a bed of mortar;
- Into chimney block insert insulation;
- Clean edges of ceramic pipe and spread high temperature sealant on it;
- Insert ceramic pipe;
- Remove excess ceramic sealant with a sponge.
| Completion of the chimney top | 6 |
- Mineral wool in last block must be shorter;
- Before inserting last ceramic pipe, shorten it with angle grinder;
- Clean edges of ceramic pipe and spread high temperature sealant on it;
- Insert ceramic pipe.
| 7 | Fastening upper package |

- Insert fastener into block to special fastener holes;
- Fastener must not be inserted fully, You should leave about 1 cm space;
- Place upper package on the last block and tighten it with screw.